|
By Corkie Bolton 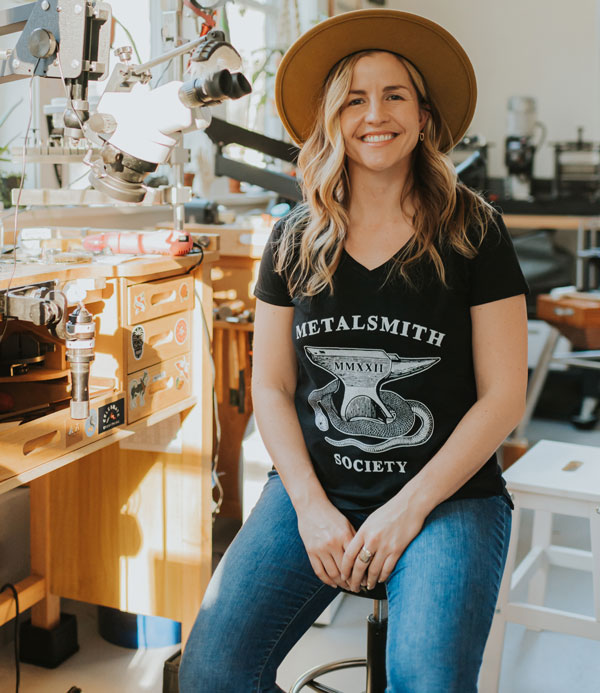 It was an incredibly exciting mail day when my Orion 150s pulse arc welder from Sunstone arrived a week ago. I have wanted the opportunity to work with a welder for many years. As someone who has been soldering jewelry with an acetylene torch for over a decade, I was fascinated by the ability to hold metal in my bare hands and fuse tiny components together—such sorcery! Now that one had arrived on my doorstep in three well designed packages, containing the welder’s power supply, the microscopic optics, and an fun orange tank of argon, I couldn’t wait get started and found I was able to complete set up within an hour. The instructions were easy to follow, but I also found my new welder had tutorial videos available right on the screen. I may have yelled: “it’s a mini computer too?!” I immediately began experimenting on a handy piece of practice steel that came with the welder. Soon after, I started digging through my silver scraps to start welding various components. I was honestly amazed by how quickly I was able to weld a tiny jump ring and attach an earring post. One thing I quickly realized was that setting myself up for a good weld was similar to setting myself up for a good solder seam: Making sure all metal pieces are flush and have a good point of contact. I know it will take some practice to become great at using the welder, but jumping into it as a beginner felt comfortable. As a jeweler, I’ve had some design ideas over the years that involved chain or delicate components that never came to fruition because I struggled to execute them with my torch, or they were too time consuming. Having the new ability to weld on finished pieces that already have set stones and to be able to attach chains and do repairs I would never have considered taking on before, has opened up a whole new world of possibilities. Within my first hour of playing with my Orion 150s pulse arc welder, I was able to create a pair of stud earrings with a chain fringe that I’ve wanted to make for years! I’m stoked to have this amazing new tool and am excited to see where it takes my work! About Corkie Bolton
Corkie Bolton graduated from Pratt Institute with a degree in metalsmithing in 2007 but didn’t launch her jewelry line until 2016. For a time, she found herself in the fitness industry but held on to her bench and torch. After moving to Boston, Corkie met a woman whose grandmother had been a metalsmith and who generously entrusted her grandmother’s beloved tools to Corkie. To Corkie, that incredible act of kindness was a sign that she had a calling in jewelry. Shortly thereafter, she launched Metalsmith Society, an Instagram community where jewelers can share information, ask questions, and learn.
9 Comments
By Richard Beach 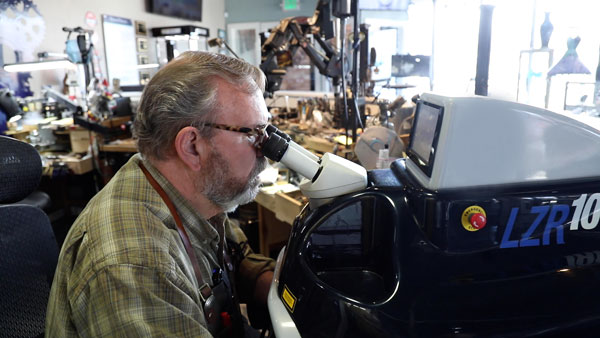 Richard Beach is a seasoned goldsmith with decades of laser welding experience. You can watch Richard live on a laser welder at JCK 2022 Las Vegas at the Sunstone booth. The secret to realizing a healthy profit from repairs is efficiency. You’ve heard the old adage that “time is money,” and with repairs it’s never been more true. The faster you can complete a repair, the more profitable the service is to your store.
A true craftsman knows the importance of having the right tools. For repairs and restorations, a benchtop laser welder is paramount, and here’s why: 1. Pinpoint Accuracy The laser welder in my store, an Orion LZR 100, provides 0.2 mm of focus, meaning repairs can be made in the tiniest of areas. I can fix filigree, channels, prongs, and chains with pinpoint precision. I can’t imagine taking on the responsibility to restore the family jewels and not have pinpoint accuracy. 2. Speed and Efficiency Not to brag but rather to set an efficiency baseline, I’ve tipped 40 prongs start to finish in less than 30 minutes. To use a torch, that kind of job would require hours of time and, in the end, I would lose money. Another example: Laser polishes the workpiece as you work, which makes clean up a breeze. And—you’ll like this—the use of such a high tech machine justifies the rush charge on those “I need it in an hour” jobs. Simply put, the laser welder is not an expense, but a money maker. 3. Work Effortlessly with Castings Every bench jeweler has experienced that job that had to be done no matter what. And then, when you get into the job, you realize you only have a partial casting, or voids, porosity, missing prongs, or all of the above. All of these issues are easily fixed with a laser welder. 4. Do the Impossible Remember the family heirloom that turned out to be nothing more than costume quality? And you promised to fix it? No problem! I’ve fixed many a piece that before having a laser welder I would have turned down. I rarely turn away any repair and have gained gratitude and customers for life. 5. Profitability Anytime you can do a job quicker, easier, cleaner, and with less effort, you put money in your pocket. The ROI is measured in weeks and months, not years. Some quick, back-of-the-envelope math will show you how much repair work you need to add to your store to justify a laser welder. And you’ll be surprised by the numbers. It truly pays for itself from day one. By Andy Jensen 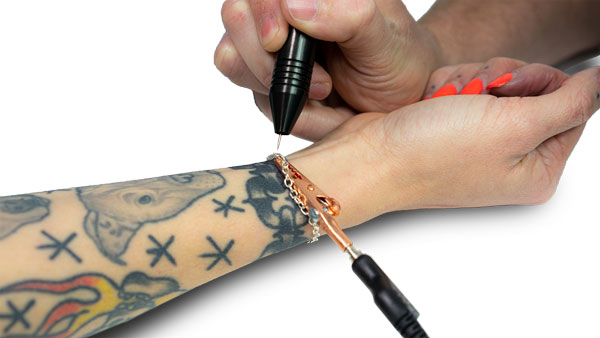 The fashion, jewelry, and tattoo industries are ever-changing stages for new trends. One that has recently caught fire is permanent jewelry, and people are lining up to have a chain of gold, platinum, or any type of metal permanently welded around their wrist or ankle.
The permanency begs two questions: How do you permanently attach a chain? Why would you want to? Let’s tackle the first question. In the permanent jewelry world, an open chain link is used to connect both ends of the chain and then welded together. Unless you break or cut the chain with wire cutters, it’ll stay attached forever. Now, for the second question: Why? For all the same reasons that drive us to be unique, daring, and bold. A permanent bracelet can remind you of love or friendship; it’s like a wedding band that never comes off. Coco Chanel, the iconic fashionista of the 1900’s said, “In order to be irreplaceable, one must be different.” You can bet Coco would be first in line for her permanent bracelet. The permanency is the main attraction, but there are two additional benefits to permanent jewelry. With no clasp, the jewelry will never get hung up on clothing, nor ever become inadvertently unclasped and lost. When you replace the clasp with a solid welded link, you never have to worry about losing something dear to your heart. Demand is strong. A Tik Tok search indicated more than 161 million views, and that’s just one social media platform! Unarguably, it’s a trend that is gaining speed. The demand is there, but how do you get started? The Secret Permanent Jewelry Tool With an Orion pulse arc welder you can close a chain in the blink of an eye. The welder has a tiny footprint, uses a normal electrical outlet, requires little training on the part of the artist, is harmless, completes the job in a fraction of a second, and is surprisingly affordable. The Orion pulse arc welder is a micro welder, so think tiny. Using electricity, the welder will heat, melt, and join the two ends of a link together forever. The heat is localized to a very small spot and can be touched without harm just seconds later. How It can Work in Your Studio The first thing that happens is your customer selects a chain. You measure out and cut the correct length, which will leave an open link on the chain. Place the chain around the customer’s wrist or ankle. Using pliers, close the ends of the link together, then touch the ends with the tip of the electrode to weld it closed. The Business Model Explained The entire process, from choosing the chain to closing the sale, is measured in minutes. How much can you charge for a permanent bracelet or anklet? That depends on the type of chain, but you should be able to charge $30-$150 for a bracelet. If you average only five permanent bracelets per day, you’ll generate $150 on the low end and $750 on the high end every day. That’s a significant new source of revenue and a quick return on your investment in the Orion pulse arc welder. Watching Out for Customer Safety When it comes to customer safety. Avoid plated finishes, such as white gold with rhodium plating, which will rub off over time. Solid metal chains are more suitable. The chain design also matters. Stick to simple designs as more complex designs will require more welding, more time, advanced skills, or all of the above. Best to keep it simple. High karat golds, like 18 karat and above, may be too soft for a fine chain intended to be worn indefinitely. Ten karat and 14 karat alloys, on the other hand, are better options as they are less likely to tarnish and are more durable. As the operator, you’ll be viewing the welding process through an ADL, or auto darkening lens, that protects your eyes from the light coming from the weld. Watching many welds without protection can damage your eyesight. For your customer, you may want to ask them to don a pair of UV protective lenses, and you’ll want to instruct anyone who may be watching to look away during the weld. Your customer should choose a chain that won’t break during normal wear and tear; however, should that chain get caught in a door or in machinery, they do want the chain to break and spare them injury. One more thing: If your customer ever requires an MRI, all jewelry must be removed. The Right Equipment For permanent jewelry the Orion mPulse and Orion 100c will provide all the energy you need: About five joules for fine chains. Each model uses a touchscreen interface. Simply use your finger to increase or decrease energy levels. The mPulse and 100c are available with microscope options, which is great for small chains because, quite frankly, you can’t weld what you can’t see. The optics replace the ADL and allow you to be much more accurate in placing the weld. Plus, the optics are mounted to an articulating arm, which can be swung out of the way. You can add the optics for a nominal fee. Pulse arc welding requires argon gas. Argon is an inert gas; it’s non-flammable, non-toxic, has no smell, no color, and exists naturally in the atmosphere. The argon acts as a shielding agent during the weld, preventing messy oxidation, leaving a cleaner weld. To make a simple business idea even more simple, Sunstone offers a permanent jewelry kit that includes everything you need to get started: Welder, gas, UV safety, pliers, leather skin barrier, and starter chain. With the kit you can offer your customers a permanent jewelry solution the same day it arrives. By Melissa Muir When making jewelry, I prefer to create pieces that are a bit different from traditional jewelry. I call my particular style “wearable art jewelry.” In the case of creating a pendant using two different types of metal, I want to illustrate not only traditional jewelry making techniques, but how I also mixed in pulse arc welding. My work tends to use a variety of metal, including gold, sterling silver, and even copper. Two of the most difficult metals to weld are silver and copper due to their conductive properties. The welding task becomes even more difficult should you wish to weld the two together due to copper and silver having conductive properties and melting temperatures that are worlds apart. Join me as I walk you through the entire process—from planning to finishing—of this swinging pendant made from copper silver. The design I chose makes traditional soldering methods difficult if not impossible. I am creating a hollow form with a design that encapsulates a large rose cut labradorite cabochon. If the stone is set, the top cannot be soldered into place. And if the top is soldered into place, the stone cannot be set. Typically, this piece would have me employ a cold connection mechanism. As you will see, a welder will solve this problem for me as well as simplify the job of attaching the swinging bail. A welder provides the perfect final touch: Two perfectly formed balls locking the bail into place. I start off by choosing the stone and a silhouette die that will give me the shape for the pendant. A silhouette die, as seen in Figure 1, features a shaped void in the center where metal can be pushed in to form a sort of pillow or embossed shape. Here I have chosen a stylized square and round rose-cut labradorite cabochon. Using the die as a guide, I draw up several different design ideas and settle on one for the final piece. The design is transferred to the metal using a pen and pencil, which will act as a guide for engraving and piercing but does not have to be exact (see Figure 2). 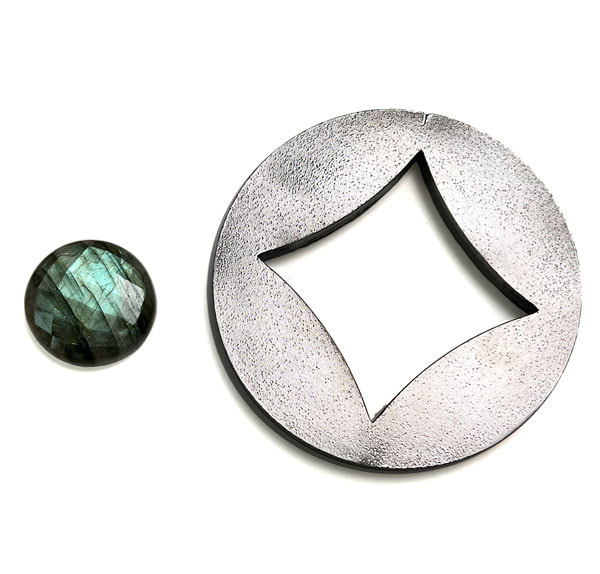 Figure 1. Silhouette die and labradorite cabochon. 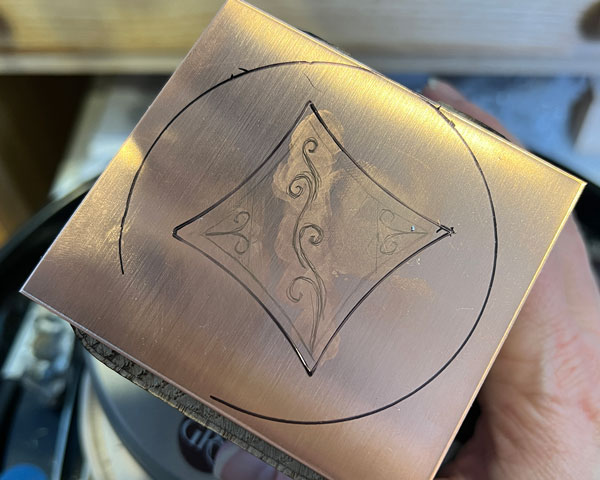 Figure 2. Design transferred to metal. In Figure 3, with the metal mounted and secured to a ball vise, you can see I use a graver to flare cut the design into the front of the piece. 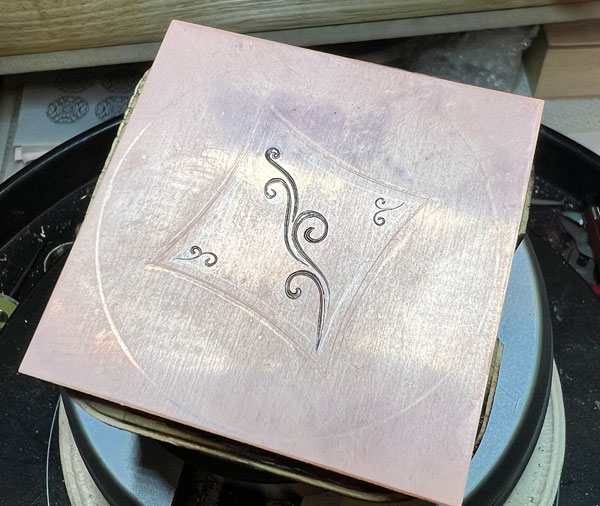 Figure 3. Using engraver to fare cut the design. Using the laser cut pattern from Rolling Mill Resources you see in Figure 4, the back piece is run through the rolling mill to provide the pendant with additional detail.  Figure 4. Adding detail using laser cut pattern from Rolling Mill Resources. The metal is taped into place on the silhouette die to keep the pattern in the desired position (see Figure 5). The die is then placed into a container along with a piece of urethane and steel pusher. The entire stack is then centered over the ram of a hydraulic jack in my press manufactured by Potter USA. I will repeat this process for both pieces applying about 2,000 pounds of pressure. 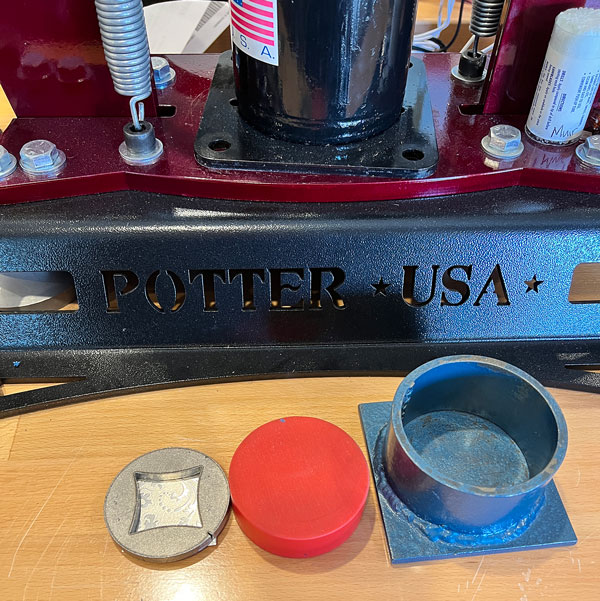 Figure 5. Using a Potter USA hydraulic jack to press pattern to the metal. Next, in Figure 6, using a jewelers saw, both pieces are cut out around the perimeter of the square shape. In addition, I cut the windows into the top piece using the engraved design as a guide. Due to the shape of the back plate, the bezel for the stone needs to be modified so it can be soldered into place securely. Sandpaper rolls come in very handy for this task as I can gently smooth away and form the bezel to fit properly (see Figure 7). The bezel is then soldered into place on the backplate. 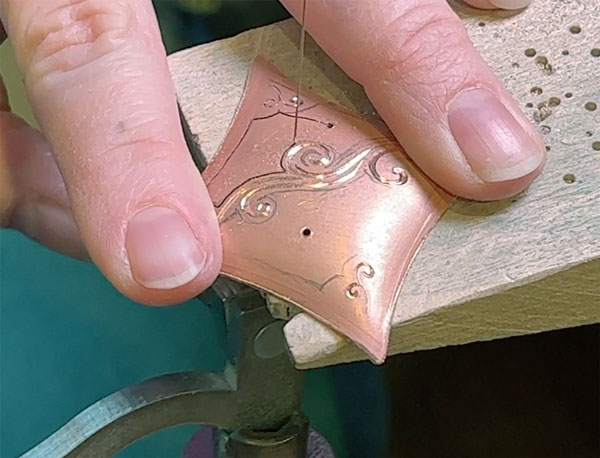 Figure 6. Use jewelers saw to cut out the background. 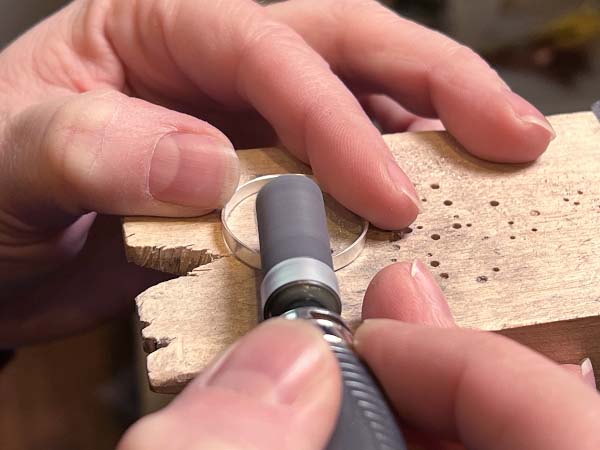 Figure 7. Smoothing the bezel for a correct fit. After a quick test fit of all the pieces (see Figure 8), I use a rubber abrasive to clean up any extra solder and polish the inside of both the top and bottom, which you can see in Figure 9. The design dictates that all this must be done before the two halves are welded together. 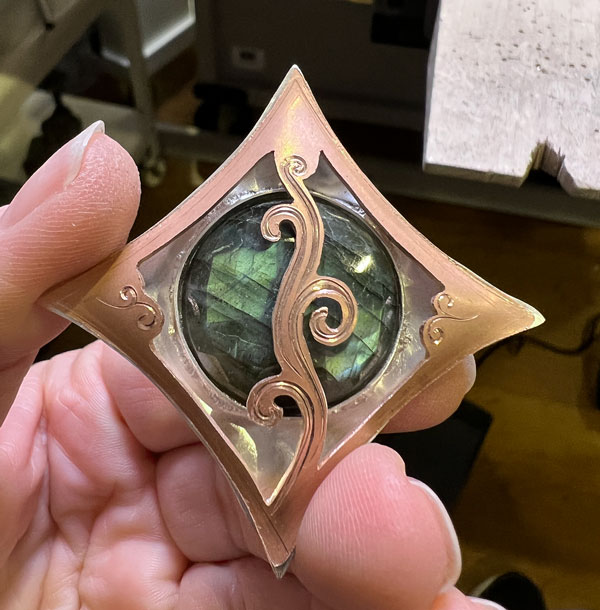 Figure 8. Checking for fit. 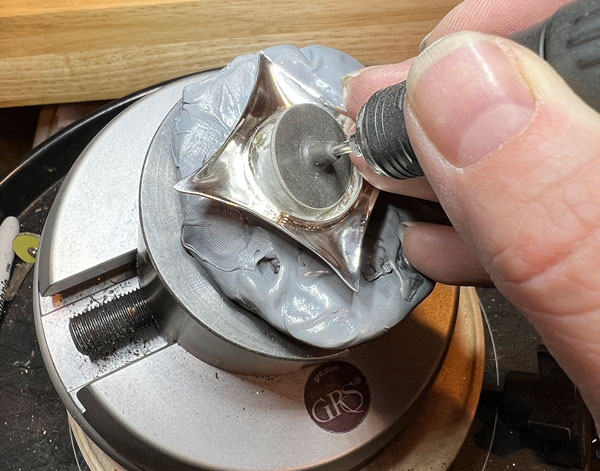 Figure 9. Cleaning up extra solder. To create a strong join, both pieces must have a good connection, similar to when soldering a bezel or ring. As you can see in Figure 10, I place a piece of 320 grit sand paper on a flat surface and rub both pieces to create a flat spot around the edges. 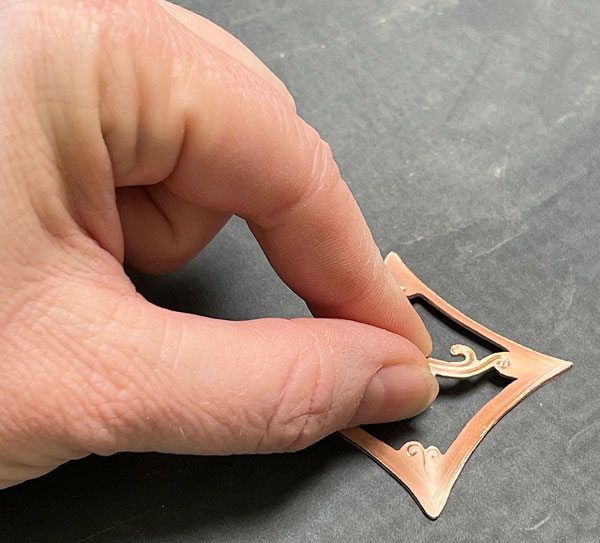 Figure 10. Creating a flat surface to create a stronger joining. Before I can weld the two pieces together, the stone must be set. I like to secure the piece in thermolock as seen in Figure 11, or some other fixturing compound to hold it steady. The stone can then be set with traditional bezel setting tools or a hammer handpiece. 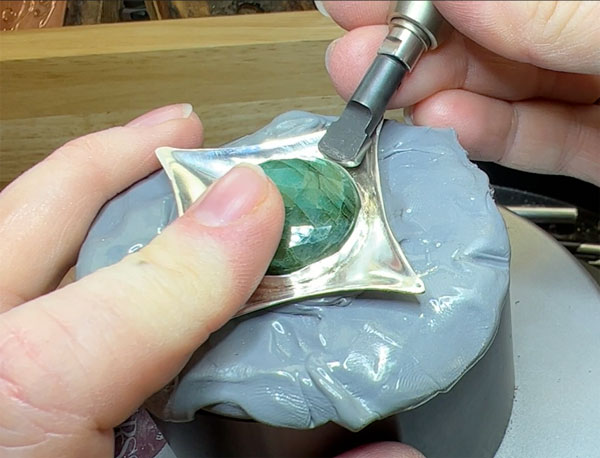 Figure 11. Setting the stone. Now, I’ll find the right weld settings for the materials I’m using. For this job I’m using the Orion 200i pulse arc welder from Sunstone, because the welder’s software walks me through the process of finding near-perfect settings. I start by selecting silver for the type of metal. Moving into the ARC screen I change a few settings:
Using scrap pieces which you see in Figure 12, I test the weld and make any necessary adjustments. (I like to use the cutoffs from the front and back to ensure that I am working with the same exact materials and thicknesses.) I want to see an even seam where there seems to be just one piece and not two. Once I am certain the settings are good for a proper join, I move to tack weld the center of each side on the pendant. 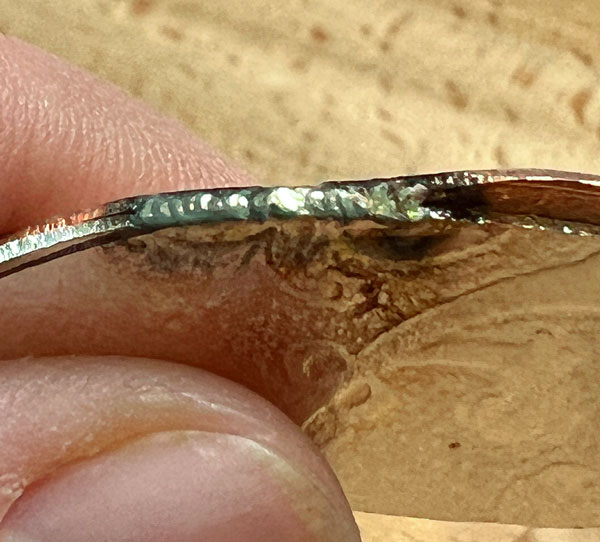 Figure 12. Testing different weld settings on scrap metal. Wearing leather gloves, I hold the piece and begin to weld one side of the pendant, making sure the electrode is touching both sides of the seam. As the piece warms up, I notice the seam becomes a little uneven and begins to have “splatters” and “drips” as you can see in Figure 13. The splattering and dripping are caused by two different factors. First, the electrode is beginning to become coated by the spattering of copper and silver, which affects the flow of energy through the electrode. Secondly, the piece is too warm for the amount of energy I’m using. 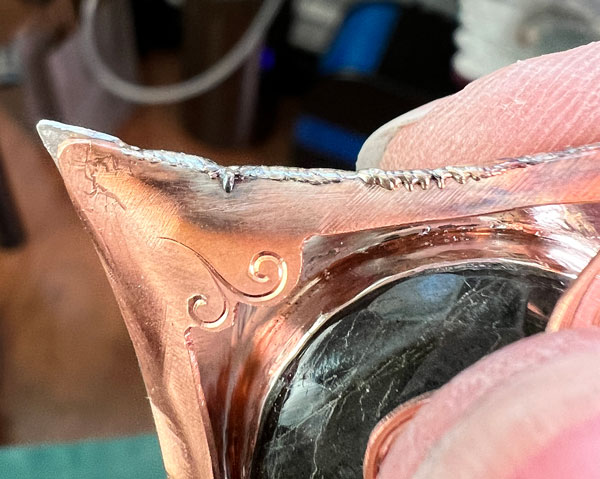 Figure 13. Weld splatters and drips. When welding copper and silver, I blunt the end of the electrode ever so slightly (see Figure 14), which helps the energy spread across the piece just a little. With a clean electrode and a change of energy down to 60 Ws, the seam is smooth, and, as you can see in Figure 15, I am left with a perfect weld bead on the edge of the piece. 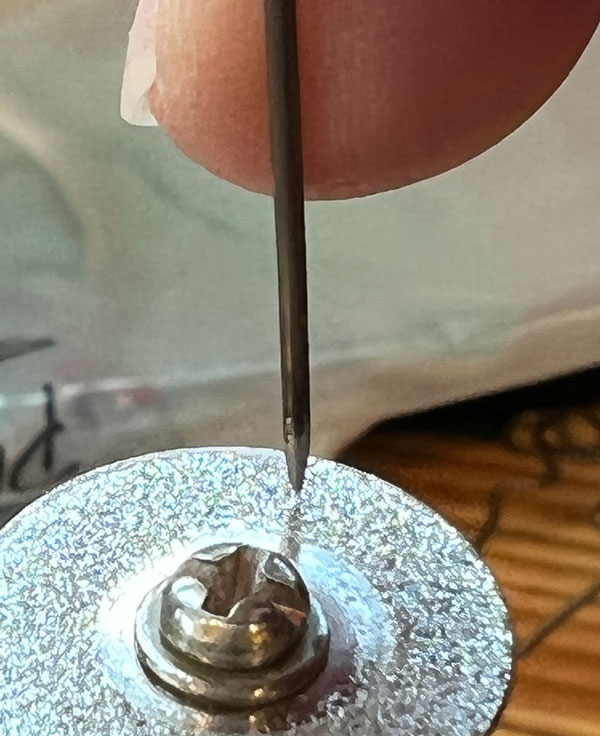 Figure 14. Blunting the electrode to spread energy across the workpiece. 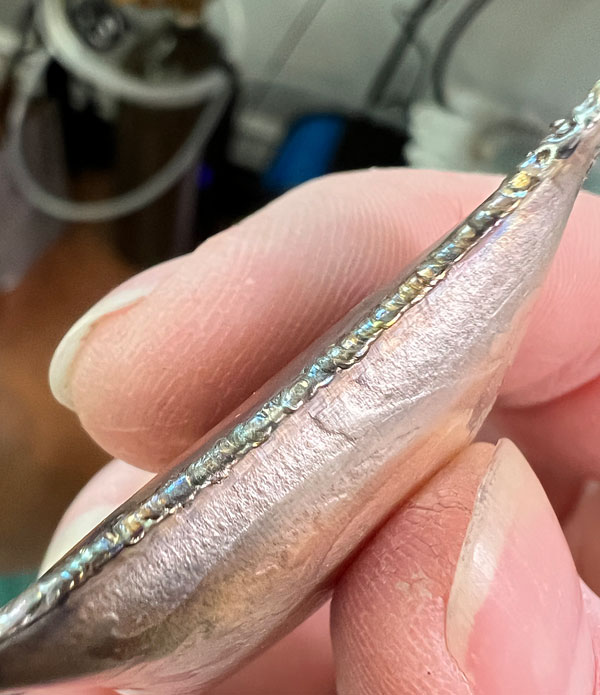 Figure 15. Better welding results with a blunted electrode. And now for the real test: Cleaning up the seam, which will clearly show if the weld is deep and solid. Because the form has an inward curve, I use a half round file to clear away as much of the metal as possible and even out the surface. (see Figure 16). If there are any pits, now is the time to fix them. If necessary, I use silver wire to add a little bit of metal to build up and smooth out the pits. Following the file, I use a sandpaper roll, then a silicone wheel, and finish with a soft cotton buff and polishing compound. 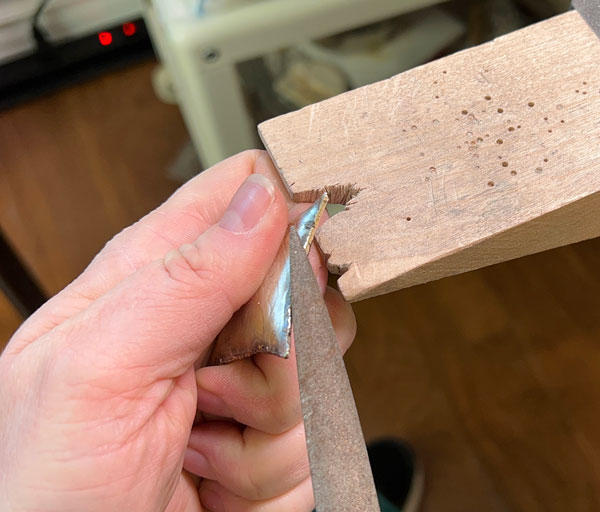 Figure 16. Cleaning up the seam. Finally, I need to make the bail. After deciding the shape, which you can see in Figure 17, I engrave a complimentary design and pierce it out with my jewelers saw. Before shaping, I measure and drill a hole at each end for the hinge pin. I use my ring bending tool from Durston Tools to bend it into a horseshoe shape. 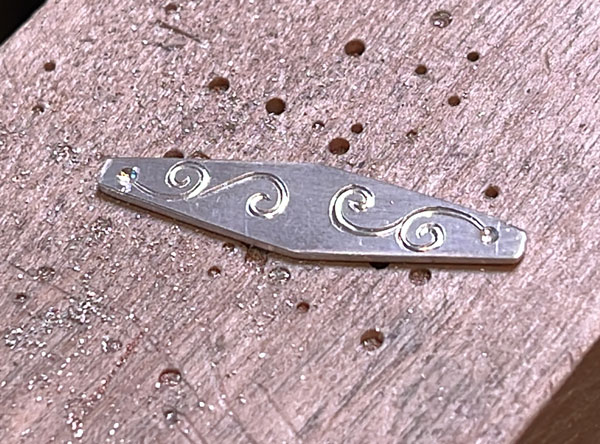 Figure 17. The bail laid flat. Using the hinge as a guide, I mark and drill a hole in the top of the pendant (see Figure 18). The wire I am using for the hinge pin is 0.8mm (20 gauge), so I use a 1.0mm drill bit for the holes. 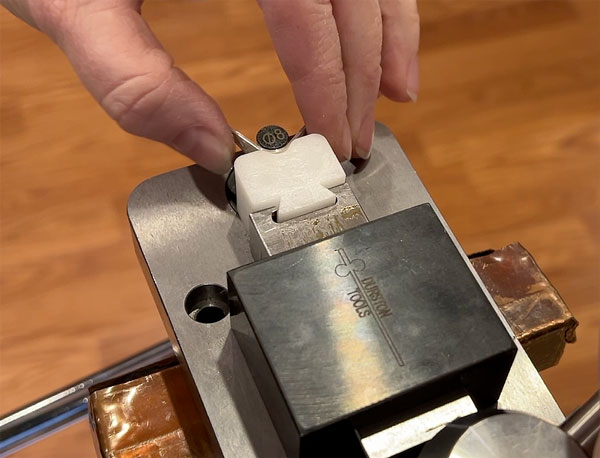 Figure 18. Bending the bail. Setting the welder to 6 Ws, I touch the end of the hinge pin wire to the tip of the electrode to form a small, perfectly round ball, which you can see in Figures 19, 20, and 21. I will typically repeat this at least once or twice to enlarge and straighten the ball if necessary. 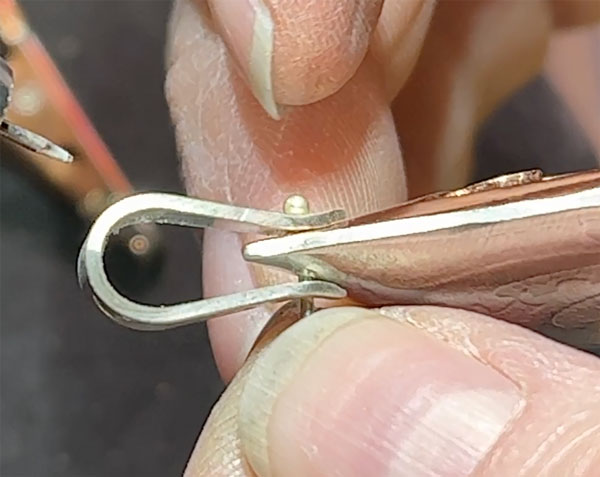 Figure 19. Balling up the end of the hinge pin. 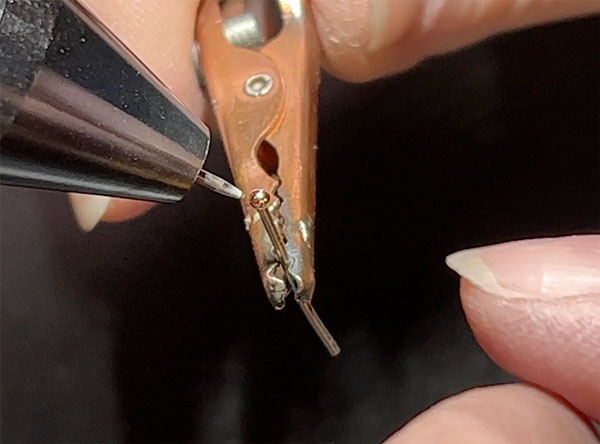 Figure 20. Using the pulse arc welder to ball up the hinge pin. 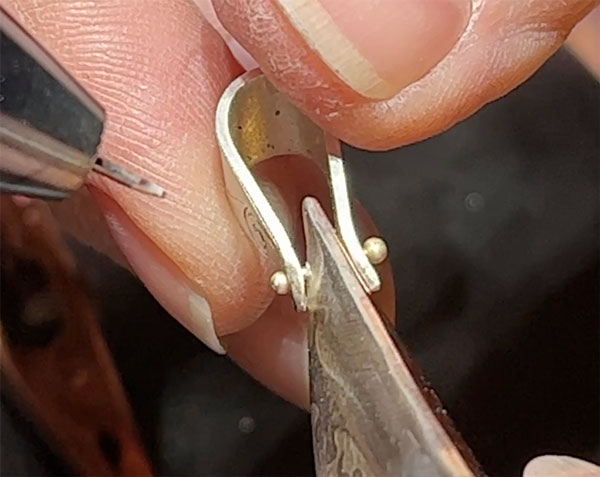 Figure 21. Closing the hinge pin with another ball using the welder. I will feed the pin through all holes capturing the pendant inside the bail. Once the wire has gone through all layers, I cut it to length, about 1/4” long, and repeat the balling process on the other end of the wire, effectively creating a hinged bail. As a final step, I remove any soot with the fiberglass brush and polish everything one last time with the soft cotton buff and polishing compound. The finished pendant speaks volumes about how much more creative I can be with a pulse arc welder. And not any welder; I’m familiar with the two major pulse arc welder brands. The Orion 200i provides the energy control I needed for a successful joining of silver and copper. When you take a close look at the edge of the pendant (see picture below), you can clearly see how the welder melded the two metals together, which I find impressive. 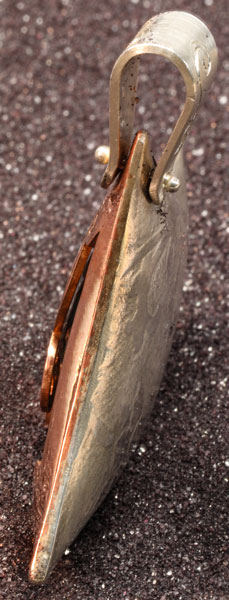 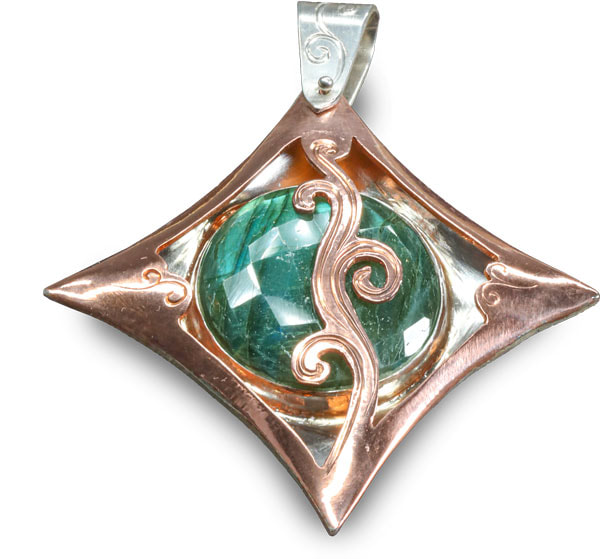 About Melissa Muir
For more than a decade, Melissa has used her skills as a talented educator to help thousands of people become more knowledgeable about tools, their uses, care, and maintenance. She works with some of the largest names in the industry as she shares her knowledge and love of various metalsmithing techniques and tools. |